7 min read
Test Three Lady Ferns Along a Sheltered Path
Try three positions before planting a long row, and compare how the fronds handle summer moisture, wind and traffic.
On this page
A drawing of a shade garden makes a row of ferns look simple. On the ground, one end of the row may receive morning sun, the other may lose water to tree roots, and a gap in the fence may direct wind onto the middle. Lady fern can make a graceful, loose edge when each clump has the shelter and soil moisture it needs. Before buying enough plants to cover the whole stretch, try three. Put them far enough apart to learn something about each part of the path.
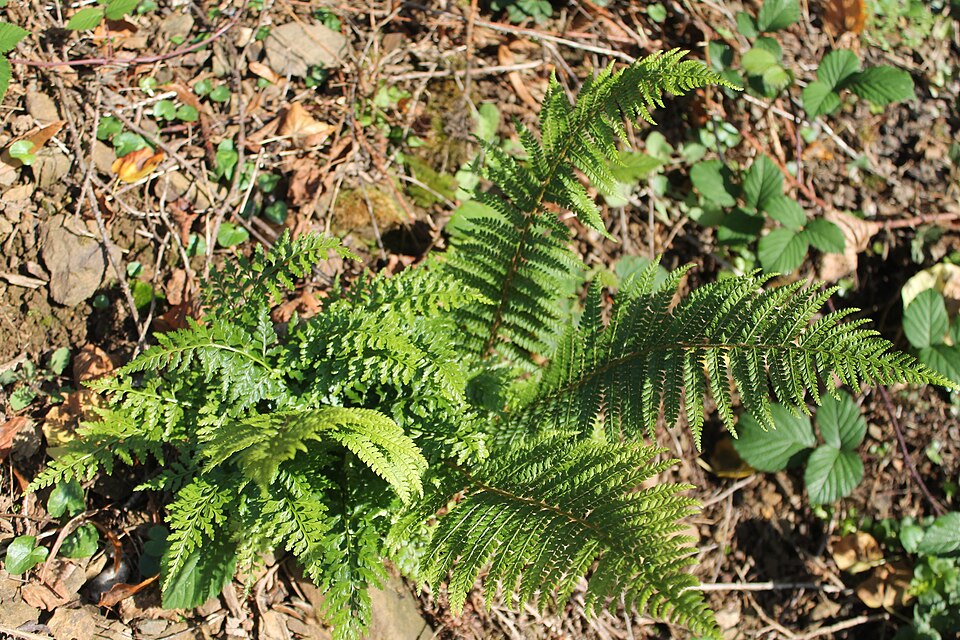
Lady fern, Athyrium filix-femina, is a deciduous fern with finely divided fronds. Many familiar forms make a clump about two or three feet tall, and the fronds arch wider as the season develops. Cultivars vary, and related types may be more suitable in some climates. The first year is a good time to see how a locally appropriate plant responds to the particular shade you have. Design the trial around conditions that vary along the path, rather than planting three pots together in the most promising corner.
Choose three places that answer different questions
Set one marker at the sheltered end of the proposed planting. This is your baseline. Look for reasonably fertile soil that retains moisture without becoming saturated and some shade during the hottest part of the day. Take account of where the fronds will lie in relation to the walk. If that clump would block a step when the leaves arch outward, move the marker a little farther into the bed now. The space should work at adult size, not just when the fern is a small crown in its pot.
Set the second marker nearer the brightest part of the shade. You may discover that some light reaches it for much of the morning and that its soil stays suitable even in warm weather. If the spot is exposed to heat off a wall or gets a beam of intense afternoon light, test it with a small clump before extending the row. Check the actual soil moisture before relying on the shade at one time of day. You can often resolve uncertainty with a few observations rather than deciding that every bright spot will scorch.
Put the third marker where there is a meaningful question about wind or summer drying, while avoiding an obviously unsuitable place. A protected track near a leafy shrub and an exposed bend can behave quite differently after rain. At each marker, push your fingers or a trowel below the surface and note the texture. A spring layer of moist leaf litter may hide a dry root zone by midsummer under a fully leafed tree. If the soil is already dry well below the surface in spring and you have no way to water, shift the trial toward a more realistic spot.
Start with comparable plants
If possible, use three nursery plants of the same labeled type and similar size. A very small specimen may take longer to establish than a firm clump with several growing points. Keep the labels. Garden forms can differ in size and frond shape, and comparing unrelated cultivars makes it harder to tell which outcomes have to do with the site. In hot parts of the southeastern United States, for example, ask a local nursery or extension adviser whether a regional lady fern form is better suited than the first plant on the bench.
Plant when the temperature and moisture allow a good start. Open a hole to fit the root ball rather than a trench following the length of the path. Where roots of a tree or established shrubs prevent planting without damage, move the fern even if that breaks an attractive line on the sketch. Set the fern at the height it occupied in its pot. Spread loose soil around the ball and water carefully to settle it. The crown should be visible after watering, with the roots covered and the lowest frond bases clear of water collecting in a dip.
Use a layer of loose leaf mold or compost over suitable ground if it will help moderate drying. Keep it away from the actual growing points. Label each position on the path side so it is easy to find without walking onto the bed. If you will water by hand, set a starting routine that allows you to check every plant. Give the moisture each needs rather than insisting on identical quantities. The difference in how much attention they require is part of what the trial is meant to show.
Compare exposure during a dry week
After planting, check the root zone in all three places. Water slowly enough for the moisture to reach the original root ball and a little of the surrounding ground. A fern with drying leaves beside a damp patch may have a dry nursery core. Check there before drenching the whole bed again. An early surface check is useful, but the time it takes for the moisture below to return to normal tells you how much care a full row will need.
Look at the direction of bent or torn fronds. Damage confined to the open side, with sound foliage to the rear, may be consistent with repeated wind. Watch the reach of a nearby branch or screen as well. Fronds that rub along one edge of a path can look frayed even where the site is sheltered. If the plant is otherwise healthy, use the remaining space to change the path edge or choose a different location for future plants. Avoid putting in a permanent support for every fern to compensate for a place that is regularly too exposed.
When fronds have yellowing, dry tips or reduced vigor, consider light and water separately. Observe the site when the sun is strongest and compare the soil at two depths. Check whether a new root ball still feels cool and moist even as a papery outer frond dries. If two plants grew well in the same weather while one faded, describe the differences in position before deciding what to improve. A nearby plant that never needed extra care can be a better model than a general rating for shade.
Read a mature frond without jumping to a diagnosis
Look at the underside of leaves once several fronds have expanded. Ferns reproduce through spores, and the spore-producing structures on a lady fern can make a patterned set of marks below the frond. Compare the arrangement with a labeled illustration if it is unfamiliar. A pattern tied to the veins on healthy leaves deserves different attention from expanding irregular patches on damaged new leaves. Observe several fronds before removing all the foliage that carries marks.
Let fronds die back as they naturally finish the season. Remove badly broken or collapsed tops where they become difficult to work around. Use the marker to avoid digging through the crown during another garden job. Consider leaving harmless old material where it sits loosely and does not bury neighboring shoots. When new curled fronds emerge in spring, separate the old stalks before clipping. Small croziers are easy to miss against leaves and soil, especially if you start cleanup from the side of the plant farthest from the path.
A division can eventually give you additional plants. Wait until a healthy clump has multiple growing points and conditions are good for re-establishment. Spring is a usual opportunity in a climate with suitable moisture and temperatures. Keep each portion rooted and replant it at the right level. Allow several seasons for broad natural clumps where growth is slow. A row intended to look loose has room for new plants without requiring the originals to divide before they have settled.
Keep each observation attached to its location. If you moved one marked plant after the first hot spell, record where it started as well as where it ended. Photograph the middle plant from the level of the walk. A frond lifted by wind may look untroubled in a photograph taken from above when its neighbor is rubbing across the stone edge.
Extend the planting only where it worked
Review the trial after summer temperatures, not just after the first period of vigorous spring growth. Record the clump that looked best from the path and the one that needed the least help. If both results point to the same part of the bed, extend the planting there and leave a useful interval between future mature fronds. In the exposed stretch, keep the successful plant only if you are happy to provide its extra care. You can use a different plant nearby or let the path have more open space.
Three good observations make a better plan than an uninterrupted row. One shows the likely size, one demonstrates the seasonal pace of drying, and one shows how a bend or opening affects the fronds. If the ferns are still sound when the next growing season starts, you can repeat the conditions they liked. Set the remaining clumps far enough from the walk that they are seen as arching foliage rather than as obstacles to pass.
Further reading: Royal Horticultural Society profile of lady fern.